
The history of knitting
Hello beautiful people,

Let’s talk today about the history of knitting.
Knitting is a centuries-old craft with a rich history that spans cultures and continents. Though its exact origins are difficult to pinpoint, it has evolved into a popular hobby and a thriving industry. This article will explore the early beginnings of knitting, its spread across the world, and how it has transformed into the diverse craft we know today.
Early Origins
The history of knitting is somewhat unclear, with various theories about its origin. The earliest known knitted items date back to the Middle East, with remnants found in Egypt that are believed to be from the 11th century. These early examples, often made of fine cotton, display complex patterns and suggest that knitting was already a sophisticated craft at this time.
One of the oldest known examples of knitting is the “Coptic sock,” which features intricate colorwork and designs. These socks were likely worn by Egyptian Christians, and the complex patterns indicate that knitting had already been refined into a detailed art form.
Spread Across Europe
Knitting began to spread from the Middle East to Europe through trade routes and migration. By the 13th century, the craft had gained a foothold in Spain, where it was practiced by Muslim craftsmen. From there, knitting spread across Europe, with evidence of its presence in England, France, and other regions.
The practice of knitting grew in popularity during the Middle Ages, particularly in regions with colder climates. Knitted items like stockings, hats, and mittens became essential for staying warm during harsh winters. In the 16th century, knitting guilds emerged, particularly in Paris, indicating a formalized structure and community around the craft.
The Knitting Revolution
By the 18th century, knitting had become more widespread, with its popularity growing among both men and women. In Scotland, the tradition of Fair Isle knitting developed, characterized by intricate patterns and vibrant colors. This style became a significant cultural export and remains a staple in the knitting world today.
During the Industrial Revolution in the 19th century, knitting machines were developed, leading to mass production of knitted goods. However, hand-knitting continued to thrive as a hobby and a means of creating unique, personalized items.
The 20th Century and Beyond
In the 20th century, knitting experienced periods of both popularity and decline. During the two World Wars, knitting became a patriotic activity, with women knitting socks, scarves, and other items for soldiers. After World War II, knitting became more commercialized, with patterns and kits available to the general public.
The latter part of the 20th century saw a decline in knitting’s popularity, as mass-produced clothing became more accessible. However, the craft experienced a resurgence in the early 21st century, thanks to the rise of the internet and social media. Online platforms like Ravelry and YouTube provided knitters with a space to share patterns, techniques, and inspiration, leading to a new generation of knitters.
Today, knitting is a vibrant and diverse craft, with enthusiasts from all walks of life. It has evolved from a practical necessity to a creative outlet, with countless patterns, techniques, and styles. Whether knitting for fashion, charity, or personal satisfaction, the craft continues to bring people together, connecting them through the shared joy of creating something with their own hands.
Hop you have found useful information.
Wish you a wonderful happy and sunny day!
With love, Doinita
Knitting, knitting and knitting again…
The therapeutic benefits of knitting
Knitting, a centuries-old craft, has recently been recognized for its therapeutic benefits. The repetitive and rhythmic motions involved in knitting can induce a state of mindfulness, similar to meditation. This can help reduce stress levels, lower blood pressure, and even decrease heart rate.
Moreover, knitting requires a level of concentration that can help distract from chronic pain or negative thoughts. It can provide a sense of purpose and achievement, especially when a project is completed. This can boost self-esteem and contribute to improved mental well-being.
Additionally, the social aspect of knitting should not be overlooked. Joining a knitting group or sharing your projects online can foster a sense of community and belonging, which is beneficial for mental health. In conclusion, knitting is not just a creative outlet, but also a valuable tool for enhancing overall well-being.
the history of knitting
1. Ancient Origins: Knitting is believed to have originated in the Middle East in the 5th century and spread to Europe by the 11th century. The oldest knitted artifacts are socks from Egypt, dating from the 11th century CE.
2. Medieval Knitting: In the Middle Ages, knitting was a male-dominated occupation. Knitting guilds were established, where men underwent rigorous apprenticeships to become master knitters.
3. The Knitting Machine: The invention of the knitting machine in the 16th century revolutionized the industry. Hand knitting became less of a necessity and more of a hobby.
4. Knitting in Wars: During both World Wars, knitting for soldiers was a common way for those at home to contribute to the war effort. Patterns for socks, hats, and scarves were distributed, and wool was rationed.
6. Modern Knitting: Today, knitting is enjoyed by people of all genders and ages. It’s seen as a creative hobby, a form of therapy, and even a political act (think of the “pussyhat” project).
The “Pussyhat Project” is a social movement focused on raising awareness about women’s issues and advancing human rights. It started in 2017 as a response to the inauguration of the U.S. President Donald Trump, and it quickly became a symbol of the Women’s March that took place on January 21, 2017.
The project encouraged people to knit, crochet, or sew pink cat-eared hats, known as “pussyhats”. The name is a play on words, referencing both the cat ears on the hats and a controversial comment made by Trump. The hats became a powerful visual statement, creating a sea of pink at the marches and drawing attention to the cause. The project aimed to provide people who could not physically attend the marches a way to represent themselves and support women’s rights.
What do you also use knitting as therapy?
With love,
Doinita
The therapeutic benefits of knitting
Hello beautiful,
How do you feel today?
As my day starts slowly and I am enjoying a cup of warm coffee, it crossed my mind to share with you some of the benefits of this beautiful craft.
So, here we go…
Knitting, a centuries-old craft, has recently been recognized for its therapeutic benefits. The repetitive and rhythmic motions involved in knitting can induce a state of mindfulness, similar to meditation. This can help reduce stress levels, lower blood pressure, and even decrease heart rate.
Moreover, knitting requires a level of concentration that can help distract from chronic pain or negative thoughts. It can provide a sense of purpose and achievement, especially when a project is completed. This can boost self-esteem and contribute to improved mental well-being.
Additionally, the social aspect of knitting should not be overlooked. Joining a knitting group or sharing your projects online can foster a sense of community and belonging, which is beneficial for mental health. In conclusion, knitting is not just a creative outlet, but also a valuable tool for enhancing overall well-being.
What do you think? Do you share same thoughts?
Let me know in the comments below.
I wish you a wonderful day, my sweet friend! 🤗
Yours,
Doinita


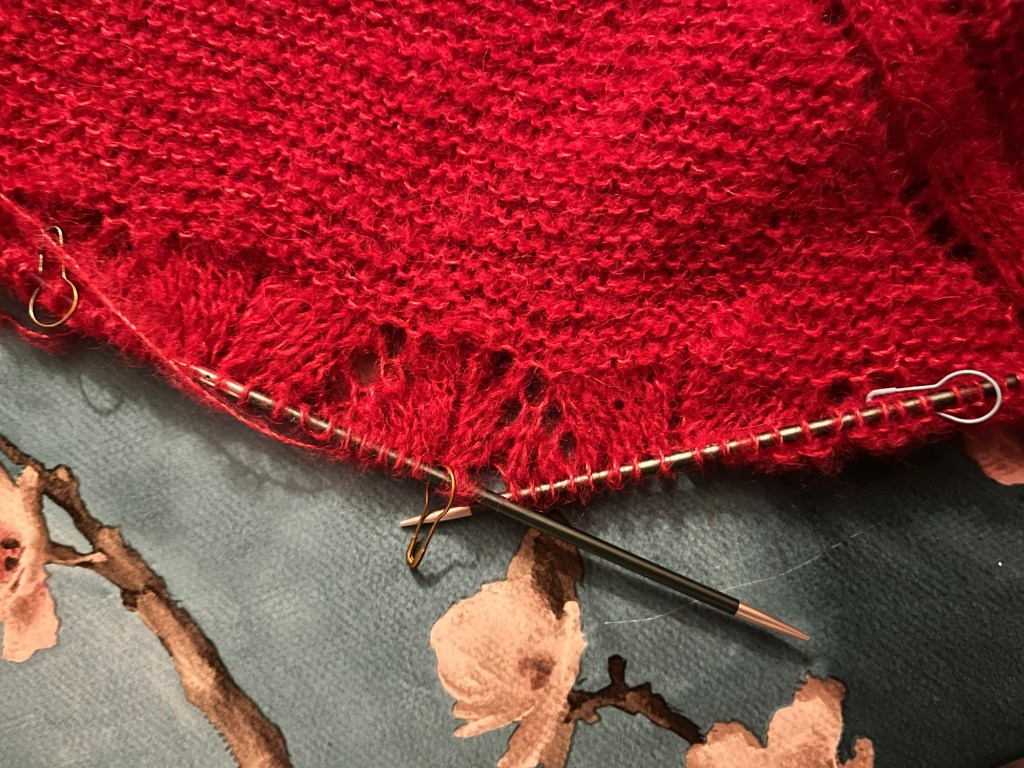
Ready for you – my knitting Notebook

It helps you to keep track of your knittings / row or whatever complicated model that you create.
If you are creating your knits for selling, then this Notebook will help you to stay organised with your Projects: you have a special area wher you can write it down how much yarn, tipe of needles, what accessories you will need.
Also you have an area to check your gauge…we know how important this could be…

The dimensions are 8 x 10 in (20 x 25 cm) so it’s perfect for your bag and you can take it everywhere with you.
Write everything down! This Notebook is a big help!
You can find it here: https://amzn.eu/d/bnS3Cre

With love,
Doinita
My knitting Notebook – is now available in my Amazon shop 🍀🥳🤩
Hello there,
My name is Doinita, I am a knitter and I used to be so very disorganized with my projects. Until I have created my own Project Notebook and I now I can have it everywhere with me. Wherever I knit or an idea pops-up, I write it down in this Notebook.
It also helps you, to keep track of your knittings / row or whatever complicated model that you create.
If you are creating your knits for selling, then this Notebook will help you to stay organised with your Projects: you have a special area wher you can write it down how much yarn, tipe of needles, what accessories you will need.
Also you have an area to check your gauge…we know how important this could be…
The dimensions are 8 x 10 in (20 x 25 cm) so it’s perfect for your bag and you can take it everywhere with you.
Write everything down! This Notebook is a big help!
You can find it hier:
With love,
Doinita
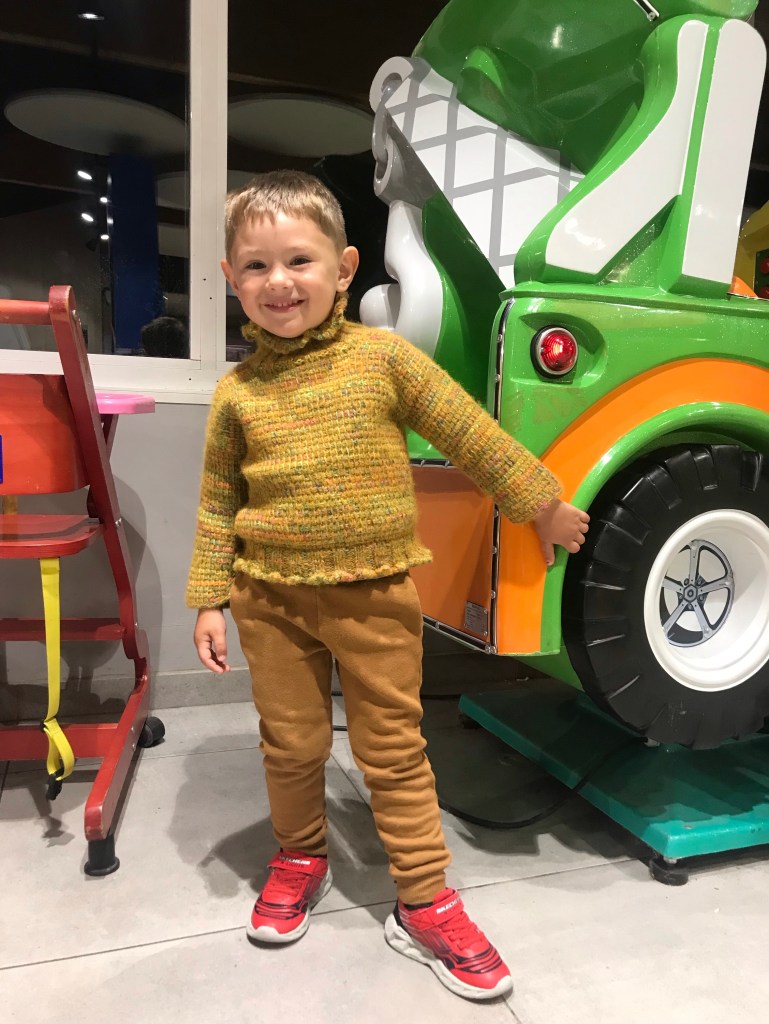
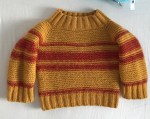
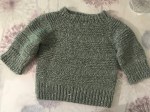
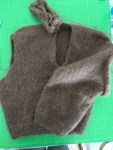
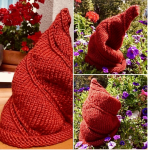
Bluza tricotata îmbinând tricotatul cu croșetatul tunisian
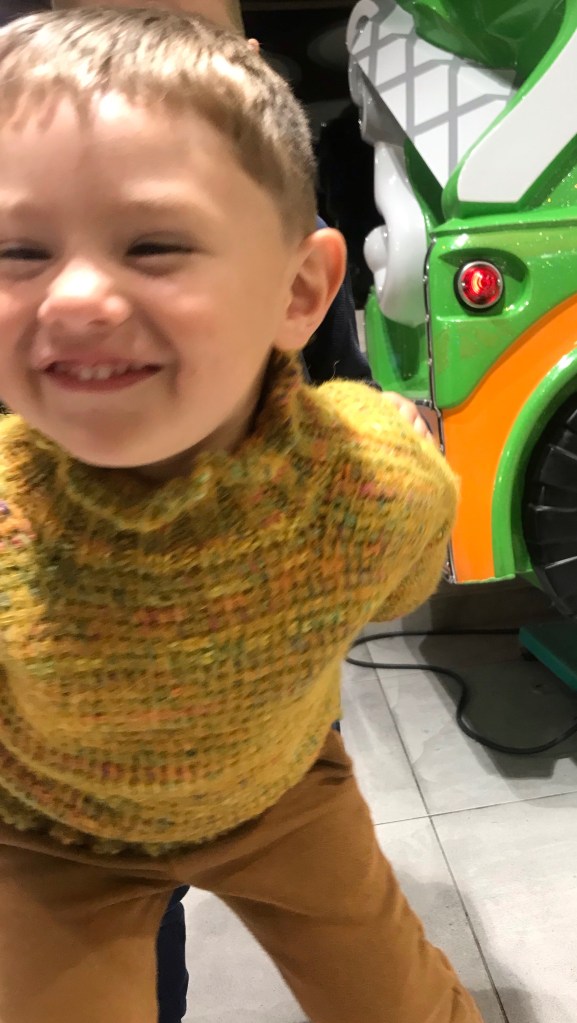
Bunaaa 🌞💐
Ultima bluza lucrata de mine cu tehnica tunisiana si cu andrelele.
Bluza a fost lucrata pentru un copil de 3-5 ani.
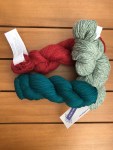
Am folosit doua fire:
Austermann STEP 6 – 150g = 410m / culoare 742 (multicolor)
lucrat împreuna cu
DROPS brushed Alpaca Silk – 25g = 140m / culoare 19 (muștar)
Croșeta tunisiana de 6,00mm
Andrele de 4,5mm
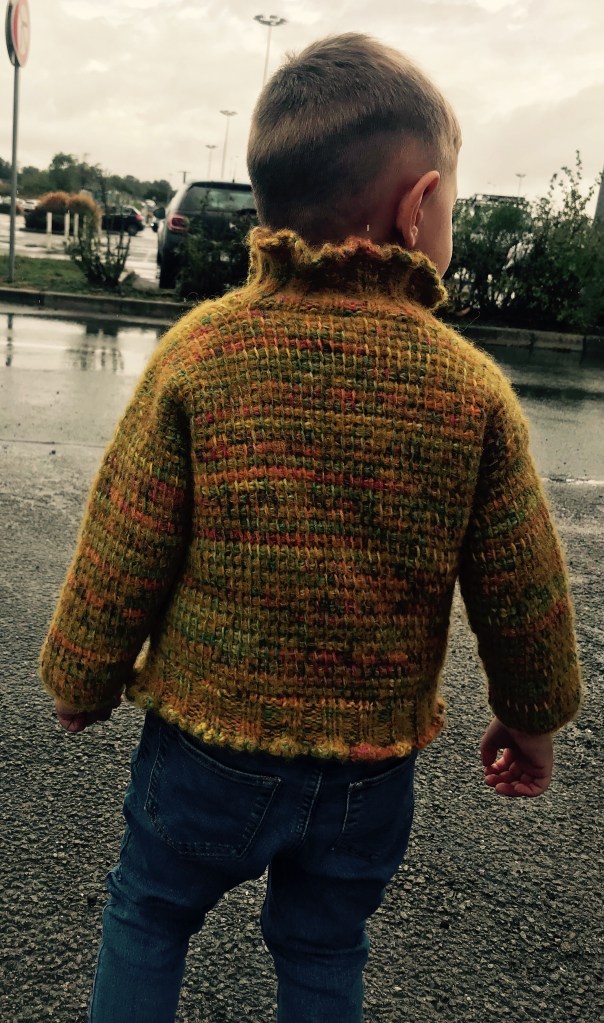
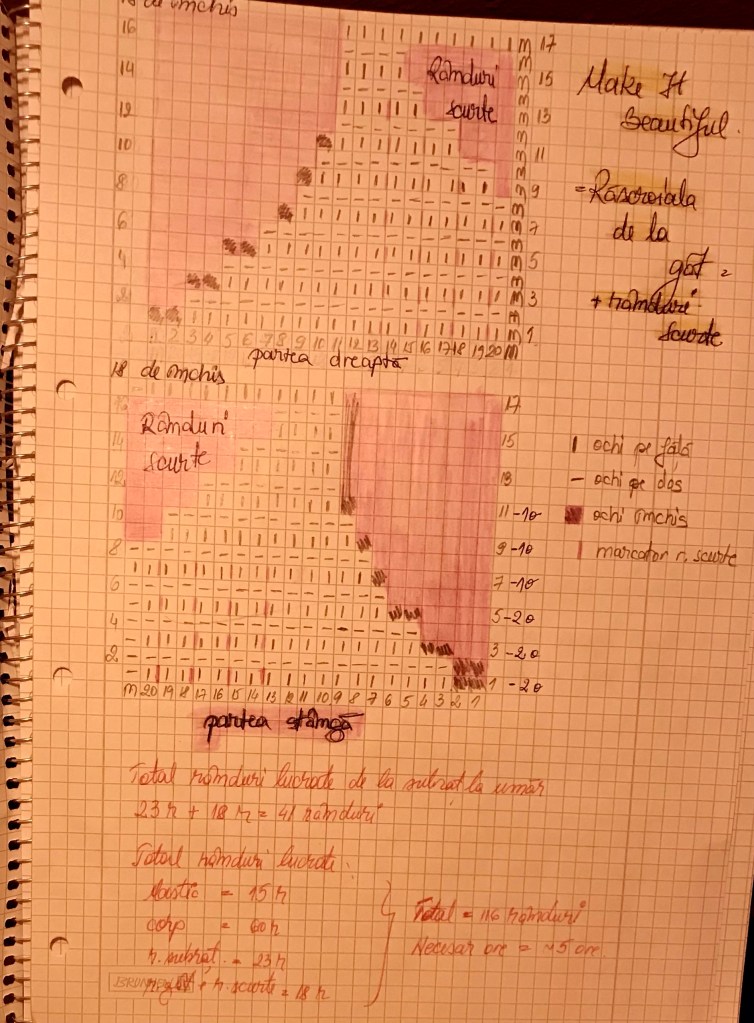
Toate părțile au fost lucrate individual: fata, spate si doua maneci.
Pentru corp:
Am montat 46 ochiuri si am lucrat pe drept
- pentru fata: 28 de randuri apoi rascroiala de la gat încă 6 randuri
- pentru spate: 31 de randuri apoi rascroiala de la gat încă 3 randuri
Rascroiala de la gât am lucrat-o in felul următor:
Se lucrează 14o, se încheie 18o, se lucrează 14o pentru acest rând + 6 rânduri / 3 randuri.
Părțile se cos la umeri si in părți.
Pentru fata se lasa 15 randuri pentru brate.
Pentru spate se lasa 17 randuri pentru brate.
Brațele:
se montează 35 de ochiuri si se fac scad la fiecare al 5-lea rând câte doua ochiuri pana avem 27 de ochiuri rămase. Se lucrează un total de 25 de randuri.
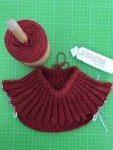
Pentru guler am montat 60 de ochiuri pe andrele, culegând ochiurile din lucru si am lucrat elastic 2×2 pentru 7,5 cm, încheiat cu punct Picot tricotat.
Pentru banda de jos, am cules ochiuri din lucru și am lucrat elastic 2×2 pentru 3,5 cm, încheind cu punct Picot tricotat.
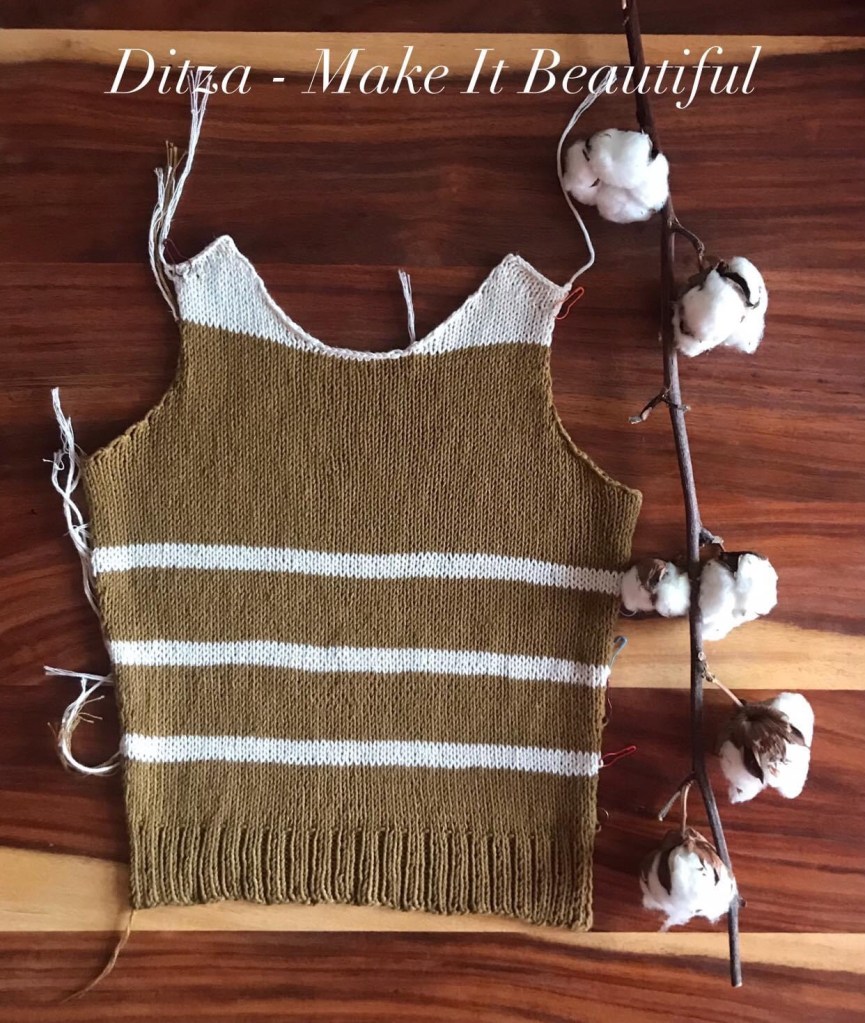
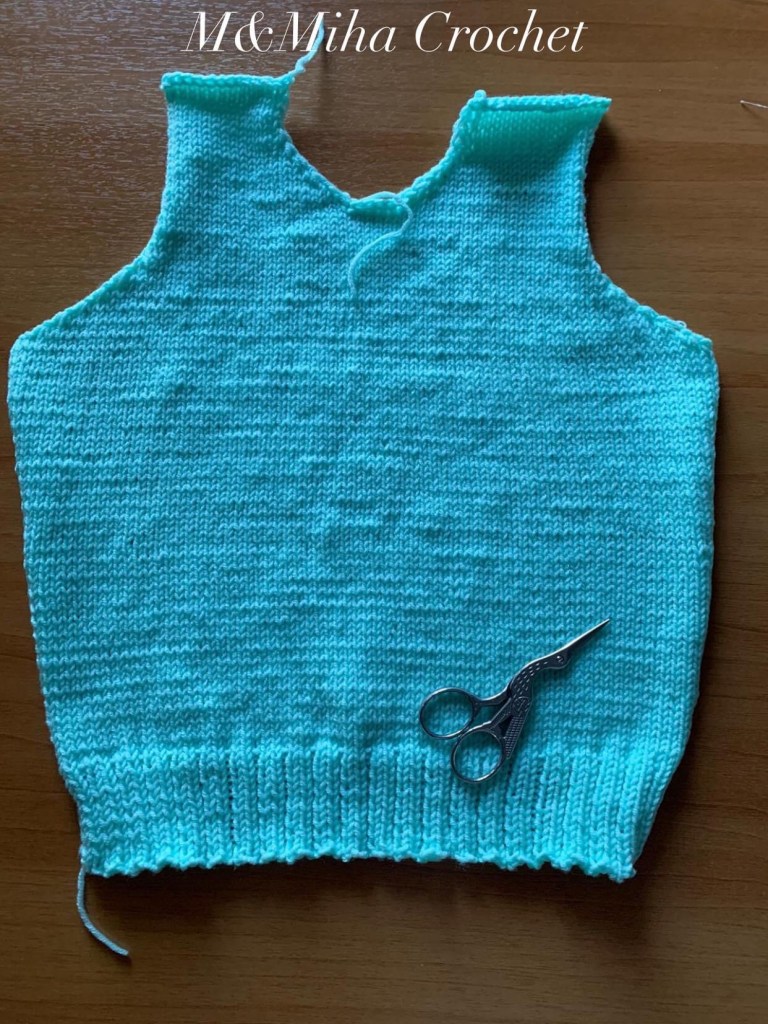
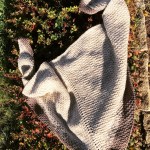
Proiect surpriza
Părțile a 3-a și a 4-a
Hello Hello 🤗☕️🌞❤️
Va mulțumesc din suflet tuturor celor care s-au înscris la provocarea mea! 😘❤️
Mulțumesc frumos Mihaela pentru susținere!!! ❤️❤️❤️
Și acum sa facem o…recapitulare: ☺️
🪡 s-au încărcat pe andrele 66 ochiuri + 2 ochiuri de margine;
🪡 s-au lucrat 15 rânduri cu elastic 2×1 (2 pe fata + 1 pe dos);
🪡 s-au lucrat 60 de rânduri cu ochiuri pe fata, pe fata lucrului și ochiuri pe dos, pe dosul lucrului.
La fiecare primul, al 9-lea, al 19-lea, al 29-lea și al 39-lea rând (rânduri pe fata) s-au adăugat câte doua ochiuri = total 76 ochiuri + 2 ochiuri de margine;
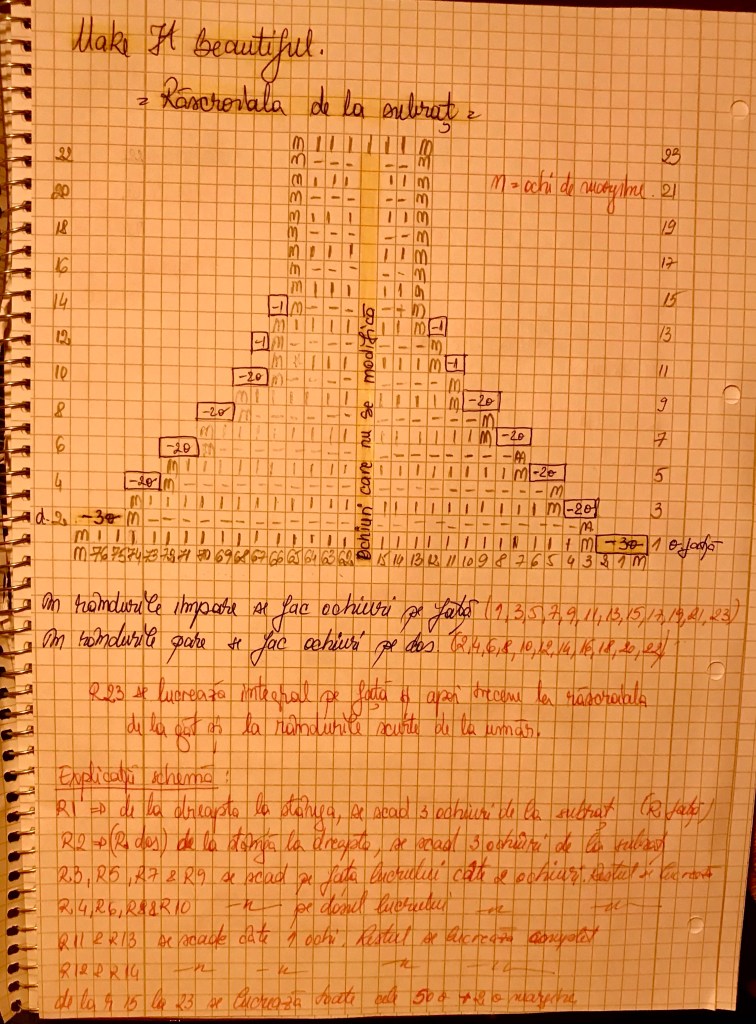
🪡 S-a făcut rascroiala de la subraț și apoi rascroiala de la gât, cu rânduri scurte.
🪡 S-a lucrat și spatele pana la rascroiala de la subraț.
Este foarte simpla, in sensul ca doar repetam pașii 1, 2 și 3.
Adică: încărcam 68 de ochiuri (66 de “model” și 2 de margine) pe andrele, lucram 15 rânduri de elastic (2×1) apoi lucram 60 de rânduri cu ochiuri pe fata, înmulțind la fiecare al 9-lea, al 19-lea, al 29-lea și al 39-lea rând (rânduri pe fata). La fel, trebuie sa avem 76 de ochiuri + 2 ochiuri de margine.
Acum urmează:
🍀🍀🍀Partea a 3-a și a 4-a🍀🍀🍀
💃🏽🪡Partea a 3-a: Rascroiala de la subraț + rânduri scurte pentru un umăr anatomic:🪡💃🏽
R1 (rând pe fata- RF): se închid 3 ochiuri și se lucrează ochiuri pe fata pana la final; întoarcem lucrul
R2 (rând le dos- RD): se închid 3 ochiuri și se lucrează ochiuri pe dos pana la final; întoarcem lucrul
R3 (RF): se închid 2 ochiuri și se lucrează ochiuri pe fata pana la final; întoarcem lucrul
R4 (RD): se închid 3 ochiuri și se lucrează ochiuri pe dos pana la final; întoarcem lucrul
R5 (RF): se închid 2 ochiuri și se lucrează ochiuri pe fata pana la final; întoarcem lucrul
R6 (RD): se închid 3 ochiuri și se lucrează ochiuri pe dos pana la final; întoarcem lucrul
R7 (RF): se închid 2 ochiuri și se lucrează ochiuri pe fata pana la final; întoarcem lucrul
R8 (RD): se închid 3 ochiuri și se lucrează ochiuri pe dos pana la final; întoarcem lucrul
R9 (RF): se închid 2 ochiuri și se lucrează ochiuri pe fata pana la final; întoarcem lucrul
R10 (RD): se închid 3 ochiuri și se lucrează ochiuri pe dos pana la final; întoarcem lucrul
R11 (RF): se închide 1 ochi și se lucrează ochiuri pe fata pana la final; întoarcem lucrul
R12 (RD): se închide 1 ochi și se lucrează ochiuri pe dos pana la final; întoarcem lucrul
R13 (RF): se închide 1 ochi și se lucrează ochiuri pe fata pana la final; întoarcem lucrul
R14 (RD): se închide 1 ochi și se lucrează ochiuri pe dos pana la final; întoarcem lucrul
De la R15 pana la R23 se lucrează toate rândurile fără sa mai scădem = 50 ochiuri + 2 de margine
💃🏽🪡Rândurile scurte:🪡💃🏽
R24 (RD): lucrează pe dos 48 de ochiuri și întoarce lucrul. Întoarce lucrul.
In momentul când ai întors lucrul, trage de fir din fata in spate, in așa fel sa creezi pe andrea 2 bucle in loc de 1 bucla.
R25 (RF): lucrează pe fata 46 de ochiuri și întoarce lucrul. Întoarce lucrul.
Firul trebuie dat din fata in spatele lucrului, creând tot doua bucle pe andrea.
R26 (RD): lucrează pe dos 44 de ochiuri și întoarce lucrul. Întoarce lucrul.
In momentul când ai întors lucrul, trage de fir din fata in spate, in așa fel sa creezi pe andrea 2 bucle in loc de 1 bucla.
R27 (RF): lucrează pe fata 42 de ochiuri și întoarce lucrul. Întoarce lucrul.
Firul trebuie dat din fata in spatele lucrului, creând tot doua bucle pe andrea.
R28 (RF): lucrează pe fata 40 de ochiuri și întoarce lucrul. Întoarce lucrul.
Firul trebuie dat din fata in spatele lucrului, creând tot doua bucle pe andrea.
R29 (RF): lucrează pe fata 38 de ochiuri și întoarce lucrul. Întoarce lucrul.
Firul trebuie dat din fata in spatele lucrului, creând tot doua bucle pe andrea.
R30 (RF): lucrează pe fata 36 de ochiuri și întoarce lucrul. Întoarce lucrul.
Firul trebuie dat din fata in spatele lucrului, creând tot doua bucle pe andrea.
R31 (RF): lucrează pe fata 34 de ochiuri și întoarce lucrul. Întoarce lucrul.
Firul trebuie dat din fata in spatele lucrului, creând tot doua bucle pe andrea.
De la R32 (RD) la R37(RF) se lucrează toate ochiurile pana la final. Întoarce lucrul.
R38(RD) lucrează ochiul de margine, lucrează pe dos 10 ochiuri, Închide 30 de ochiuri, lucrează și celelalte 10 ochiuri și ochiul de margine. Întoarce lucrul.
R39, 40 și 41 lucrează cele 10 + 10 ochiuri separat, cu cele doua ochiuri de margine. 🙂
R42 Închide lucrul.
💃🏽🪡Mânecile🪡💃🏽
🪡🪡🪡Mâneca lunga:
Pentru fiecare mâneca se montează 44+2 de ochiuri și lucrează 106 rânduri, făcând înmulțiri la fiecare al 10-le-a rand. Se adauga câte un ochi la fiecare margine. => r106 = 66 +2 oochiuri
R107: se închid 3 ochiuri. Lucrează pana la final
R108: se închid 3 ochiuri. Lucrează pana la final.
In următoarele 8 rânduri se închid câte 2 ochiuri la fiecare margine. (De la R109 la 116)
Următoarele 4 rânduri se Închide câte un ochi la fiecare margine. ( de la r 117 la 120)
Ultimile 9 rânduri se lucrează fără modificări. ( de la r 121 la 129)
La r 130 închidem lucrul.
💃🏽💃🏽💃🏽🍀Spor la lucru și ne revedem la părțile finale. 🍀💃🏽💃🏽💃🏽
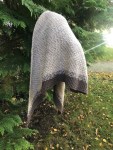
Proiect surpriza tricotat
Partea a 3-a
Hello Hello 🤗☕️🌞❤️
Va mulțumesc din suflet tuturor celor care s-au înscris la provocarea mea! 😘❤️
Mulțumesc frumos Mihaela Miha Rotaru pentru susținere!!! ❤️❤️❤️
Și acum sa facem o…recapitulare: ☺️
🪡 s-au încărcat pe andrele 66 ochiuri + 2 ochiuri de margine;
🪡 s-au lucrat 15 rânduri cu elastic 2×1 (2 pe fata + 1 pe dos);
🪡 s-au lucrat 60 de rânduri cu ochiuri pe fata, pe fata lucrului și ochiuri pe dos, pe dosul lucrului.
La fiecare primul, al 9-lea, al 19-lea, al 29-lea și al 39-lea rând (rânduri pe fata) s-au adăugat câte doua ochiuri = total 76 ochiuri + 2 ochiuri de margine;
🪡 S-a făcut rascroiala de la subraț și apoi rascroiala de la gât, cu rânduri scurte.
Acum urmează:
🍀🍀🍀Partea a 3-a🍀🍀🍀
Este foarte simpla, in sensul ca doar repetam pașii 1, 2 și 3.
Adică: încărcam 68 de ochiuri (66 de “model” și 2 de margine) pe andrele, lucram 15 rânduri de elastic (2×1) apoi lucram 60 de rânduri cu ochiuri pe fata, înmulțind la fiecare al 9-lea, al 19-lea, al 29-lea și al 39-lea rând (rânduri pe fata). La fel, trebuie sa avem 76 de ochiuri + 2 ochiuri de margine.
Spor la lucru și ne revedem curând!🍀💃🏽
Proiect surpriza tricotat – a doua parte
proiect1_surpriza
Hello Hello 🤗☕️
Va mulțumesc din suflet tuturor celor care s-au înscris la provocarea mea! 😘❤️
Mai întâi de toate, sa facem o…recapitulare: ☺️
🪡 s-au încărcat pe andrele 66 ochiuri + 2 ochiuri de margine;
🪡 s-au lucrat 15 rânduri cu elastic 2×1 (2 pe fata + 1 pe dos);
🪡 s-au lucrat 60 de rânduri cu ochiuri pe fata, pe fata lucrului și ochiuri pe dos, pe dosul lucrului.
La fiecare primul, al 9-lea, al 19-lea, al 29-lea și al 39-lea rând (rânduri pe fata) s-au adăugat câte doua ochiuri = total 76 ochiuri + 2 ochiuri de margine;
Acum urmează:
🍀🍀🍀Partea a 2-a🍀🍀🍀
Facem rascroiala de la subraț și apoi rascroiala de la gât, cu rânduri scurte.
(Sa intru live sa va arat cum le lucram – pentru acelea care nu știu cum se lucrează rândurile scurte?)
Va rog sa urmăriți Instrucțiunile din pozele anexate și dacă aveți nelămuriri, va aștept cu intrebari.
Spor la lucru și ne revedem curând!🍀
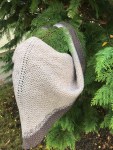
Proiect Surpriza – prima Parte
🐿🐿🐿Partea 1🐿🐿🐿

Buna dimineața!
Am folosit andrele de 2,5mm și 3,75mm pe care le-am alternat la fiecare rând. Adică un rând l-am lucrat cu 2,5mm și pe celălalt l-am lucrat cu 3,75mm.
Încarcă pe andrele 66 de ochiuri + 2 ochiuri de margine și lucrează elastic de 2 ochiuri pe fata + 1 ochi pe dos (fără sa iei in considerare ochiurile de margine), pentru o înălțime de 4,5 cm (sau 10 rânduri).
Apoi lucrezi doar ochiuri pe fata, înmulțind la fiecare 10 rânduri cu câte 1 ochi in partea dreapta și stânga, pentru o înălțime de 60 de rânduri (sau 22cm).
La finalul acestor 72 de rânduri, ar trebui sa ai pe andrele 76 de ochiuri.
Spor la lucru și ne revedem curând!🍀


You must be logged in to post a comment.